How to get perfect colours in your videos
How to use the X-rite colorchecker video to get perfect colours.
How to get perfect colours in your videos
In this weeks video, I discuss how to get the perfect colours for your videos. I show how to use the X-Rite Color Checker Video and my DaVinci Resolve workflow. I also talk about why it is important to get the white balance in-camera before you even start filming!
How to set yourself up for success during production
For years, colour correcting and colour grading have always been one of the weakest parts of my videos. having the correct colours is vital if you are shooting a product or a particular brand.
This was partly down to my style of filming, it's usually very run-N-gun, and I often don't have the time I need to properly set up shots quite how I would like, and this results in me neglecting of the most basic tools every camera has custom white balance.
Getting the correct white balance in camera is the key to starting your videos of on the right foot and will save you a lot of trouble when it comes to colour correcting and grading later on.
The is particularly important if you are filming in Rec 709 with 8-bit footage, which no doubt a lot of us are. Even if you are filming with a camera that uses a higher bit rate and some variation of Log, whether that be Log C, Slog 2,3, or canon Log, getting the right white balance in camera is still important.
If you're filming in raw, you don't have so much to worry about if you get it wrong, however, I would still recommend taking the time to set it up correctly.
Over the past year or so, I've been making a conscious effort to improve my colour game and so I decided to invest in the X-rite ColorChecker video.
There are a few variations of colour checkers out there and I decided to go for this one as it's specifically targeted for use with video as opposed to photography, as it has the chromaticity references for Rec.709 (Broadcast HD).
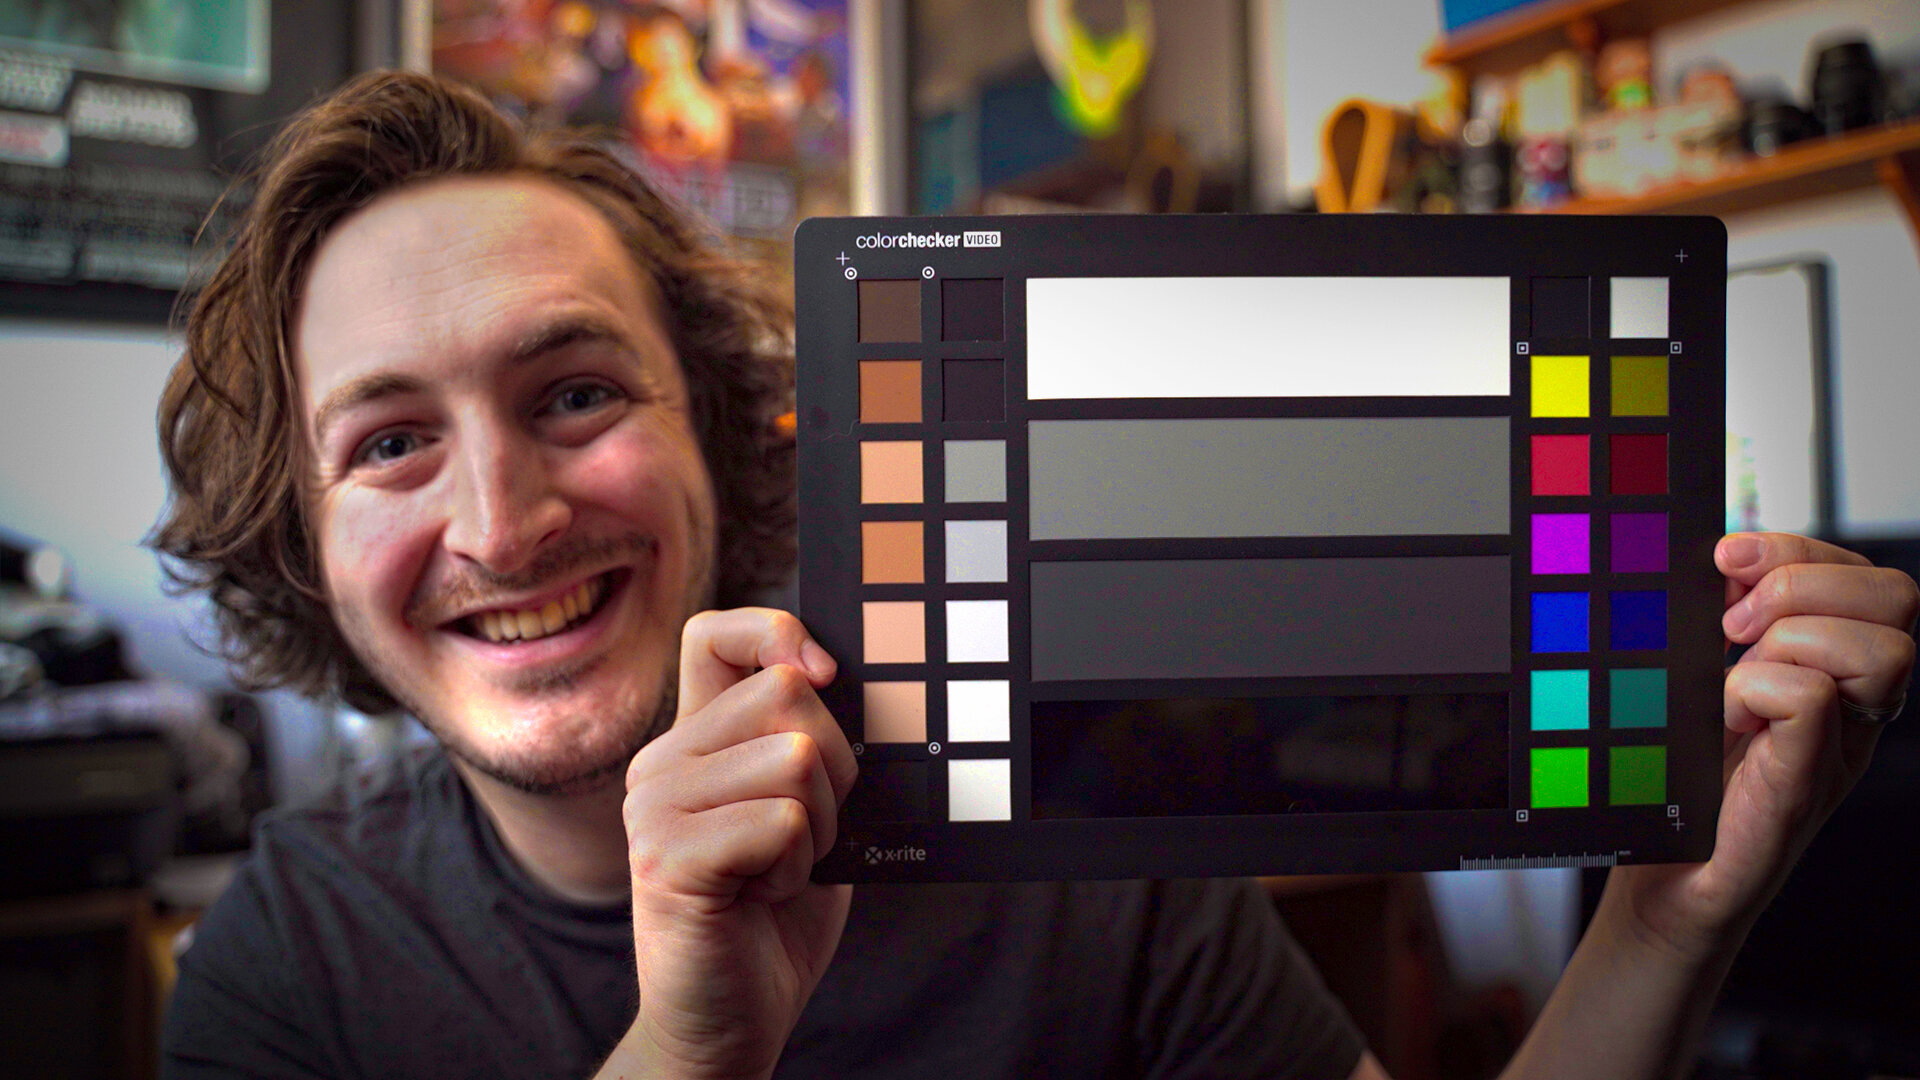
So just to give you a quick rundown of what is actually on this chart.
First of we have the grey balance chips which are these 4 large ones right in the centre and these smaller ones just to the side.
The 4 large chips are your highlight and shadow greys and range from
A high gloss black which is Black - 0 - 10% IRE
Dark grey - 20 - 30%
Light gray chip - 40 - 50% IRE ( this is 18% middle grey chips)
White - 90 - 100% IRE
These smaller chips are a linear greyscale and include extra steps for highlight and shadow regions
on the other side of that you have the skin tone colours, and so when you have a correctly balanced shot - these colour chips will line up with the skin-tone or flesh tone axis on a vectorscope
on the opposite side, you have your saturated and desaturated primary colour chips which as I mentioned earlier have been specifically targeted for video production.
finally, on the reverse side, you have the white balance target
This is a spectrally neutral target. which means it reflects the light evenly and so you will be able to get the correct white balance regardless of the lighting conditions.
So this chart is fantastic for helping you to get correct exposure as well but I'm not going to be covering that so much in this video as I'll be focusing on colour.
So first things first, before you start filming you want to set your custom white balance for the area you are shooting in. If you are shooting in multiple areas you may have to repeat this step, however, some cameras allow you to save a few custom white balances.
To do this, all you need to do this set down or hold up the white balance target within your frame, and use the custom white balance tool on your camera, this varies from camera to camera.
This will give you a solid starting point for your shot. This is easier if you are shooting in a controlled environment, I know however this is not always the case.
To make sure you have perfect colours when it comes to correcting and grading, all you need to do is record someone holding up the other side of the chart for a few seconds before starting to film. make sure that the high gloss black is positioned so that it is not reflecting light toward the camera as this will affect your results.
You can either hold up the chart yourself or if you have an assistant or even the talent can do it (if you have the time with them). worse comes to worst you can always set it up on a c stand with a clamp.
That's all you need to do at this point, the next step is in post-production.
What to do in Post-Production
Once you have imported your footage into your post-production software of choice. These are the next steps. In this example, I'm going to be using DaVinci resolve, however, premiere pro and final cut have similar tools to help you get the same results.
There are a couple of ways to make use of the colour checker. The first is to use the built-in features in resolve to match with the chart you are using. In my case, I'm using the Video ColourChecker. I shot in Slog-2 and will be exporting in Rec 709.
If you are using Premiere and don't have this feature built-in, you can use this second method.
First, you will need to isolate the centre section of the chart using a mask. You can then see where each chip lines up on your luma waveform
Secondly, you will have to repeat this step but with the primary colour chips and use the vectorscope.
Make use of the hue vs hue so that each of the lines matches up with the appropriate box.
Depending on the type of footage you are using. you don't want to push it too far, so keep an eye on the different stands and make sure they don't become too stringy as you will probably start to notice a lot of artifacting in your image.